Are you looking to build a trellis for your garden? Look no further. You can certainly build a trellis out of pretty much anything you’d like, so if you have some extra building material laying around, get creative and build a trellis out of that.
For the purpose of this article, we are building a trellis out of PVC piping. Building your very own PVC trellis is very easy, it doesn't take much time, as far as building things goes, plus they're relatively cheap, durable, and light.
If you've never built anything before, you have no need to worry. This is a great project to start with. By the time you're done, you'll be making up new garden projects to get creative with and to construct.
Materials Needed
- 81 feet of PVC Pipe
- 8 PVC Elbows
- 16 PVC Tees
- Hacksaw
- PVC Cement
- String
- Zipties
- Sandbags for weighing them down after constructed
- Motivation
- Good tunes and/or audiobook
How to Construct
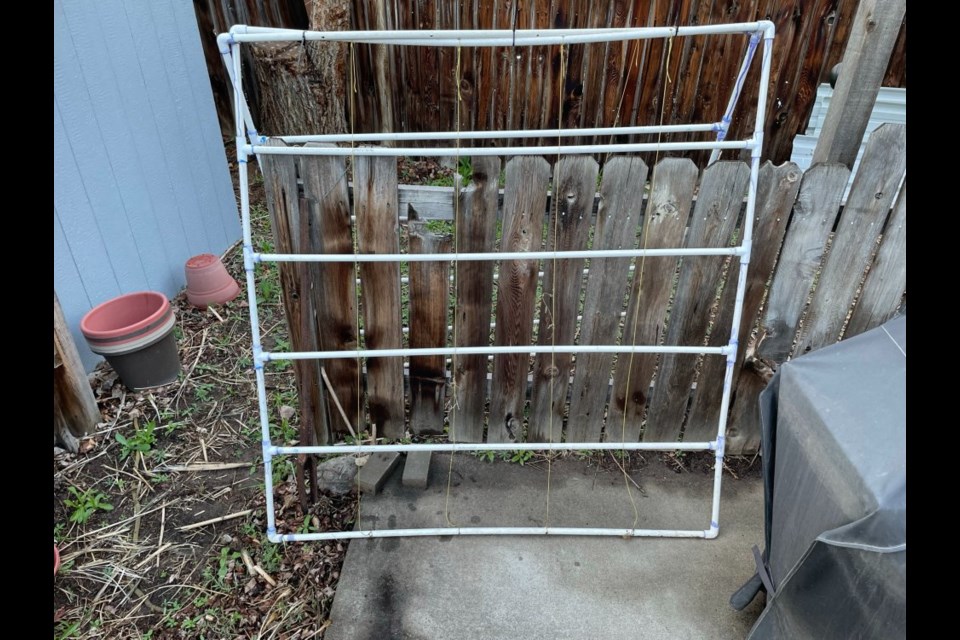
The trellis we are making today runs 56" tall, or 5.5 ft, and 61.5" wide. Horizontal PVC rows run about every 13 inches, making four rows in between the top and bottom PVC rows. Strings are run vertically and placed about every 14 inches.
1. Make the border of the trellis first. Cut and put two 56" pieces of PVC on the ground for the two vertical sides. Then cut and put two 61.5" pieces of PVC on the ground for the top and bottom horizontal pieces. Measure twice, mark the cut points with a sharpie and cut once with a hacksaw.
2. If you want four horizontal rows then cut four additional 61.5" pieces of PVC and put them on the ground, spacing them about every 13 inches.
3. On the ground you now have a rough outline of your trellis, make sure everything is roughly fitting before moving on.
4. Mark your cut points for the horizontal rows, cut, insert the PVC tees and loosely fit the piping together. Do this on both sides.
5. Connect the top and bottom PVC rows with the PVC elbows.
6. Everything for one side is now loosely fitted together.
7. If everything looks good, take apart each joint one at a time, put PVC cement on it and put it back together.
8. Tie a piece of string about every 14 inches so it runs vertically, tie this string to the top and bottom PVC pipe.
9. Once you have two trellis sides assembled and the PVC cement is dry (it dries really fast), tie the two sides together with a few zip ties.
10. Set the trellis out in the yard and weigh it down with sandbags.
11. Enjoy your brand new, crafty and creative trellises.
Have a question?
If you have any questions or subjects that you would like me to cover in this column, they can be emailed to [email protected] with the subject of “Longmont Leader Question.” I will happily answer any questions that you may have, after all this column is for you to benefit from and enjoy.


